
Views: 0 Author: Site Editor Publish Time: 2026-07-17 Origin: Site


A chainsaw is only as effective—and safe—as the specific components that make up its cutting loop. Operators frequently experience poor cutting performance, accelerated equipment wear, or dangerous kickback due to a misunderstanding of chain anatomy. Selecting the wrong replacement chain or failing to identify specific component wear leads to equipment downtime and safety hazards. By deconstructing the four primary components of a Chainsaw Chain—cutters, drive links, tie straps, and rivets—operators can accurately diagnose wear patterns, evaluate repair versus replacement options, and select the exact chain specifications required for their guide bar and application. Understanding these parts prevents catastrophic failures on the job site. You need to know exactly how the metal interacts with the wood and the guide bar. We will break down the mechanical function of each part so you can keep your saw running at peak performance.
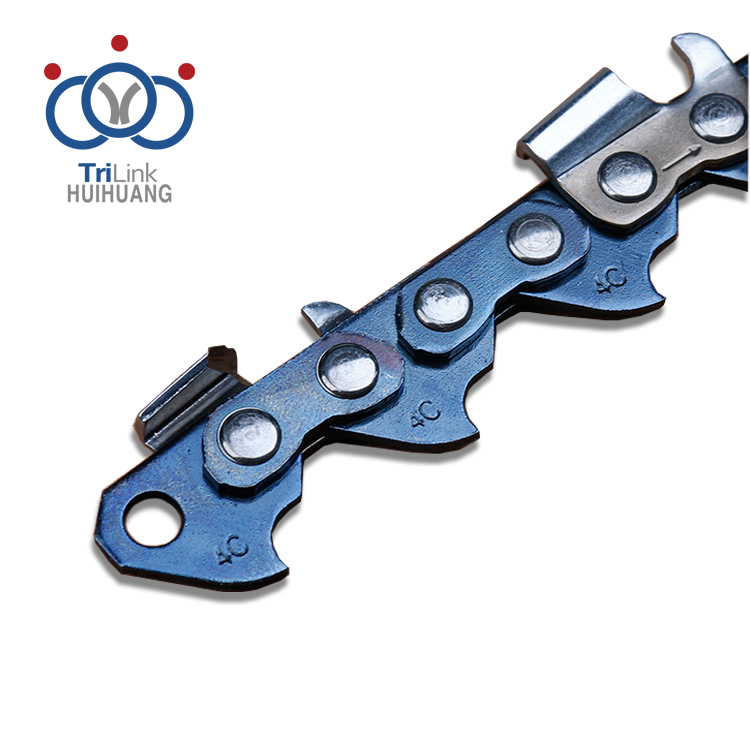
Component Synergy: Cutters, drive links, tie straps, and rivets must operate in exact alignment; failure in one component compromises the entire chain loop and guide bar.
Compatibility is Non-Negotiable: Drive links dictate the exact pitch and gauge required for compatibility with the chainsaw's sprocket and guide bar groove.
Performance Dictated by Cutters: The profile of the cutter (full chisel, semi-chisel, or low profile), its directional orientation, and the height of the depth gauge determine cutting speed, finish, and kickback risk.
Repair Feasibility: While individual damaged cutters or tie straps can be replaced using dedicated chain breakers and rivet spinners, systemic rivet wear or tie strap stretching requires a full chain replacement.
Table of Contents
To evaluate a chain for purchase or repair, operators must first understand the structural baseline and mechanical function of each individual part. You cannot troubleshoot a cutting problem if you do not know how the chain is built. Every loop consists of a specific sequence of metal parts engineered to slice wood fibers, clear chips, and ride smoothly on a steel rail.
The cutter serves as the working end of the chain. It does the actual physical work of severing wood fibers. A standard cutter features a top plate, a side plate, and a cutting corner. The side plate severs the cross-grain of the wood. The top plate then acts like a chisel, lifting the severed wood chip out of the kerf. The cutting corner is the intersection of these two plates. It takes the brunt of the impact and dulls the fastest when you hit dirt or rocks.
The depth gauge sits directly in front of the cutting edge. Many operators call this the raker or drag. It controls the bite depth of the cutter. The height difference between the top of the depth gauge and the top plate determines how thick of a wood chip the cutter will take. If the depth gauge is too high, the cutter cannot reach the wood. If it is too low, the cutter grabs too much wood, causing the saw to stall or kick back violently.
Cutter sequence impacts chip clearance and engine load. Standard sequences place a single tie strap between each cutter. This provides a smooth cut but requires high engine power. Semi-skip and full-skip sequences space the cutters further apart. Full-skip chain places two tie straps between cutters. This reduces the number of teeth engaged in the wood at any one time. It clears chips faster on long guide bars and keeps the engine RPMs high. You must also alternate left-hand and right-hand cutters. This orientation balances lateral cutting forces. If you have too many cutters facing one direction, the saw will pull to that side, resulting in a curved cut.
The drive link engages directly with the drive sprocket. It transfers rotational force from the engine to the chain. Without drive links, the chain would just sit on the bar. Drive links interact differently with spur sprockets compared to floating rim sprockets. Spur sprockets drive the chain with fixed star-shaped teeth. The drive link sits between these teeth. Floating rim sprockets use a smooth, splined drum. The drive link sits inside the rim, which aligns the chain perfectly with the bar groove. Rim sprockets provide a much smoother power transfer and reduce wear on the drive links.
Drive links also ensure the chain tracks smoothly within the guide bar groove. The bottom portion of the drive link, called the tang, fits inside the groove. It acts like a rudder on a boat, keeping the chain straight as it travels at high speeds. If the tang is too thin for the groove, the chain will slop side to side. If it is too thick, it will bind.
These links perform a critical lubrication function. The drive link tangs pull bar oil from the reservoir at the powerhead. They carry this oil along the bottom of the bar groove and distribute it evenly along the guide bar rails. Many drive links feature small holes or dimples specifically designed to hold extra oil. Without this distribution, the friction between the chain and the bar would melt the metal within minutes.
Tie straps connect cutters and drive links. They form a continuous, flexible loop. You can think of them as the chassis of the chain. The flat underside of the tie strap rides directly on the guide bar rails. This surface acts as the primary load-bearing area for vertical cutting pressure. When you push the saw into a log, the tie straps transfer that downward force onto the steel rails of the guide bar.
Standard tie straps are flat metal pieces with two holes. They sit opposite the cutters to balance the chain. Preset tie straps come with factory-installed rivets on one side. You use presets to join chain loops together securely. When you break a chain to shorten it or repair a broken link, you must use a new preset tie strap to put it back together. Reusing old tie straps compromises the structural integrity of the loop.
Rivets provide a secure, high-tensile pivot point. They hold the cutters, drive links, and tie straps together while allowing the chain to articulate smoothly around the bar nose and sprocket. A chainsaw chain is essentially a heavy-duty bicycle chain. It must bend around tight radiuses at thousands of revolutions per minute.
Rivets require strict metallurgical properties. They undergo induction hardening to withstand extreme rotational speeds and severe lateral forces without shearing. The center of the rivet acts as a bearing surface for the drive link. The ends of the rivet are spun over to create a flange that holds the tie straps in place. If a rivet shears, the chain snaps and whips back toward the operator.

Evaluating how different variations of these components align with specific cutting applications determines your success criteria. You cannot use the same chain for felling clean timber as you would for cutting dirty firewood. The physical shape of the components dictates how the saw behaves in the cut.
Full chisel cutters feature square corners. The side plate and top plate meet at a sharp 90-degree angle. They deliver high cutting speeds in clean timber. Professional loggers prefer full chisel because it severs wood fibers efficiently. However, that sharp corner dulls instantly if it touches dirt, rocks, or frozen bark.
Semi-chisel cutters use rounded corners. The transition between the side plate and top plate is curved. They cut slightly slower than full chisel, but they hold their edge much longer in dirty or frozen wood. The rounded corner deflects abrasive material rather than absorbing the impact directly. Firewood cutters and arborists working on dead, dirty trees rely on semi-chisel chains.
Low-profile cutters suit consumer-grade saws. They feature a shorter chassis and a shallower cutting angle. They offer reduced kickback compliance for safer operation. You will typically find low-profile chains on electric saws, pole pruners, and gas saws under 50cc.
Cutter Style | Corner Shape | Best Application | Durability in Dirt |
|---|---|---|---|
Full Chisel | Square | Clean timber, professional felling | Very Low |
Semi-Chisel | Rounded | Firewood, dirty bark, frozen wood | High |
Low Profile | Rounded/Shallow | Consumer saws, pruning, limbing | Moderate |
Depth gauge height directly correlates with the cutter angle and physical output. Proper calibration produces large, uniform wood chips. Poor calibration produces fine sawdust. As you sharpen the cutter, the top plate gets filed back. Because the top plate slopes downward toward the rear, the cutter gets shorter as it gets filed. You must lower the depth gauge to maintain the correct height difference.
Filing depth gauges too low causes aggressive biting. The cutter grabs more wood than the engine can pull. This increases kickback risk, causes severe vibration, and stalls the engine. It also puts immense stress on the rivets, leading to premature chain breakage. Filing them too high results in slow cutting and excessive friction. The cutter cannot reach the wood, so the chain just rubs against the log, creating heat and sawdust.
You must evaluate chain compatibility using drive link measurements. You cannot guess these numbers. Pitch is the distance between any three consecutive rivets divided by two. Pitch dictates saw size and power requirements. A larger pitch means larger, heavier chain components. A 60cc saw can pull a 3/8" pitch chain, but a 30cc saw will bog down trying to pull that same chain.
Gauge is the exact thickness of the drive link tang. You must match the gauge perfectly to the guide bar groove. This prevents chain slop or binding. If you put a .050" gauge chain in a .058" bar groove, the chain will lean sideways during the cut. This causes the saw to cut in a curve and rapidly wears out the bar rails. If you try to force a .058" chain into a .050" groove, it will bind and snap.
Measurement Type | Common Sizes | Application Impact |
|---|---|---|
Pitch | 1/4", 3/8" LP, .325", 3/8", .404" | Determines sprocket compatibility and saw power class. |
Gauge | .043", .050", .058", .063" | Matches guide bar groove width to prevent slop. |
Identifying component-level degradation early prevents catastrophic failure, guide bar damage, or operator injury. Chains do not last forever. The metal wears down through friction and impact. You must inspect the loop regularly to catch problems before they ruin your guide bar or snap the chain.
Inspect the top and side plates for signs of rock strikes or wire damage. Chipped chrome plating indicates severe impact. When the chrome flakes off, the underlying steel cannot hold an edge. You must file the cutter back past the damage to restore cutting performance. Sometimes, a rock strike will completely shear off the cutting corner.
Uneven sharpening of cutters creates unequal bite depths. If you file the left-hand cutters more than the right-hand cutters, the left side of the chain will take a smaller bite. This leads to curved cutting paths. The saw will pull to the right. This uneven pressure also causes accelerated guide bar rail wear, as the tie straps grind heavily on one side of the bar.
Peening refers to battered drive link tangs. The bottom of the tang gets hammered and mushroomed out. A worn drive sprocket, poor chain tension, or bottoming out in a worn bar groove causes peening. When the chain runs too loose, the drive links slam into the sprocket teeth instead of engaging smoothly. This impact batters the metal.
Worn sprockets rapidly ruin new drive links. Grooves cut into spur or rim sprockets damage the tangs immediately. If you put a brand new chain on a heavily worn sprocket, the sprocket will chew up the drive links within a few hours. Damaged drive links fail to distribute bar oil. The battered tangs cannot carry oil effectively. This failure leads to rapid overheating, causing the bar rails to turn blue from friction.
The concept of "chain stretch" is largely a myth. Chains elongate due to the physical wearing down of rivets and the inner bearing surfaces of tie straps. The metal itself does not stretch like a rubber band. As the chain runs, friction wears away the steel on the rivet shaft and the hole in the drive link. Multiply this microscopic wear by 70 or 80 drive links, and the entire loop becomes noticeably longer.
Inspect the chain for excessive lateral play. Hold the chain out horizontally and see how much it sags sideways. Side-to-side flex indicates critical rivet wear. If the chain bends easily in a lateral direction, the rivets are worn out, and the chain is unsafe to use. Guide bar rail splaying allows tie straps to tilt. When the bar groove gets too wide, the tie straps lose their vertical support. This causes uneven wear on the bottom of the tie straps and results in crooked cuts.
Assess the cost, safety, and operational efficiency of repairing a chain loop versus buying a new replacement. Sometimes it makes sense to fix a broken loop. Other times, you are just wasting time and risking injury by trying to salvage worn-out metal.
You can repair a localized break using specialized tools. Replacing a single rock-damaged cutter or a snapped tie strap is feasible if the rest of the chain has plenty of life left. Maintain correct cutter sequence during any repair. You must match the left and right orientation perfectly. If you replace a left-hand cutter with a right-hand cutter, you will have two right-hand cutters in a row, which will cause the saw to cut crooked.
You need a bench-mounted chain breaker and a rivet spinner to do this correctly. You punch out the old rivets, insert the new component with a preset tie strap, and spin the new rivets. Technical skill ensures the new rivet achieves a professional, dome-shaped finish without binding. If you spin the rivet too tight, the joint will stiffen, and the chain will not bend around the bar nose. If you spin it too loose, the chain will snap under load.
Identify the damaged component and mark the adjacent tie straps.
Use a punch and anvil on the chain breaker to push out the old rivets.
Remove the damaged part and insert the replacement component.
Install a new preset tie strap and a standard tie strap on the opposite side.
Use the rivet spinner to roll the rivet heads into a smooth dome.
Check the joint for flexibility; it should move freely without lateral slop.
High-volume users often purchase 100-foot reels of chain. Arborists, loggers, and forestry professionals spin their own loops. This approach offers a strong return on investment compared to buying pre-cut loops. A 100-foot reel yields about 25 loops for a 20-inch bar. If you go through a chain every week, spinning your own loops saves significant money. However, you must factor in the cost of the breaker and spinner tools, as well as the time required to assemble the loops.
Compare factory original equipment manufacturer chains against aftermarket alternatives. Evaluate the steel quality and chrome plating thickness on the cutters. Cheap aftermarket chains often use softer steel that dulls quickly and stretches rapidly. Factory rivet lubrication also varies between brands. Premium chains inject heavy grease into the rivet joints during assembly, which reduces initial wear. High-quality Chainsaw Chain replacements ensure longevity and safety. Do not compromise on chain quality to save a few dollars, as a broken chain can cause severe injury.
Understanding the structure and function of every chainsaw chain component helps improve cutting efficiency, extend service life, and reduce safety risks. Regular inspection, proper maintenance, and selecting compatible chain specifications are essential for keeping your chainsaw performing at its best.
Zhejiang TriLink Huihuang is a professional chainsaw chain and guide bar manufacturer specializing in saw chains, guide bars, harvester products, and related forestry accessories. With automated production capabilities, strict quality control, and extensive OEM experience, the company provides reliable cutting solutions for forestry, landscaping, and outdoor power equipment markets worldwide.
Inspect your current chain for uneven cutter wear or drive link peening before starting your saw.
Locate the pitch and gauge stamped on your guide bar to ensure exact replacement compatibility.
Verify depth gauge heights using a dedicated gauge tool and flat file before making your next cut.
Discard any chain loop showing excessive lateral flex or visible rivet wear to prevent snapping.
A: The drive link is the bottom section of the chain. It fits directly into the guide bar groove. It engages the chainsaw sprocket to transfer engine power to the cutting loop. Drive links also pull and distribute bar oil along the rails to prevent overheating.
A: Worn rivets cause excessive lateral flexibility in the chain. You will notice an inability to maintain proper chain tension. The chain loop will visibly elongate, often referred to as "chain stretch," which is actually the physical wearing away of the rivet material.
A: Standard tie straps are flat metal connectors with two empty holes. Preset tie straps come with rivets already permanently installed on one side. You use presets to join the ends of a chain loop together during assembly or repair.
A: The height difference between the depth gauge and the cutter's top plate determines the bite depth. It dictates how thick of a wood chip the cutter takes. If the gauge is too low, the saw bites aggressively and risks kickback.
A: Yes, you can replace a single cutter. You need a bench-mounted chain breaker and a rivet spinner. This repair is only safe and effective if the rest of the chain is not severely worn or elongated.
A: Pitch is the distance between any three consecutive rivets divided by two. Gauge is the exact thickness of the drive link tang. You usually measure gauge with precision calipers to ensure it matches the guide bar groove perfectly.